
|
Throwing, Firing, & Glazing Pots - How ToCheck out all of my free tutorial videos on Youtube! See my Online Store for more teaching resources.
Available on DVD - My 3 hour "Custom Clay Pottery Tools" series
In Part 1, learn step by step how to make your own custom ribs and throwing sticks out of clay. In Part 2 put your tools to work and learn how to use them to make your own forms highly unique. Great for potters at all levels of experience. Click disk images above to order. See Online Store and video excerpts below for more information.
How to Throw a Bowl on the Wheel
|
|
 |
Get Out the ClayHere is a 25lb bag of stoneware clay. There are a lot of different kinds of clay. |
 |
Cut and Weigh the ClayUse a wire tool to cut off a slab of clay and weigh it on a scale. Cut the clay. |
 |
“Wedge” the ClayWedging clay is kind of like needing dough. Repeatedly push the clay into itself to remove any air bubbles. There are different ways to wedge clay. |
 |
Put it on the WheelMake a ball with the clay and smack it down onto the wheel as close to the center as possible. Clay on the Wheel |
 |
Center the ClayCentering the clay can be very difficult. Start by wetting the clay and your hands. Turn on the wheel at a fast rotation speed. Push from the top and the sides until the clay is perfectly centered on the turning wheel. That doesn't sound so hard, does it? |
 |
“Pull” the ClayPulling clay is the method you use to raise the sides. Reach into the opening with your left hand, and support the outside of the clay with your right hand. Apply pressure to pinch the clay. In a controlled motion, pull the clay up. Pull up the walls of the pot. |
 |
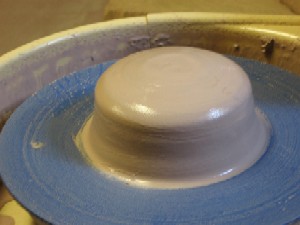
Shape the Form into a BowlMake controlled pulls that spread the clay outward at the top giving the pot the shape of a bowl. Form a bowl |
 |
Dry Bowls & Load for BisqueOnce the bowl reaches leather hard, I trim the foot ring on the bottom by putting the bowl back on the wheel upside down. Then I let it totally air dry to a state called "bone dry". At this point I load all my bone dry pots into the kiln for their first firing. I use multiple shelves in the kiln and stack pots on top of each other. |
 |
Bisque FireOnce the kiln is loaded, I start the firing cycle. I must raise the temperature slowly so that the clay is not thermally shocked which can cause cracking. The bisque firing lasts about 9 - 10 hours for cone 04. Then the kiln must cool for 10 - 12 hours before opening. Notice that the clay has turned pink after the bisque fire, and the cones bent over. |
 |
Unload the BisqueThe pots must be bisqued before glazing so that they are strong enough for handling. After the bisque they will still absorb water, and this is necessary for glazing to work. I sit the pots out on newspaper to get ready for glazing. I have to carefully decide what glaze to use on each pot to compliment the form in color and character. |
 |
Wax the FootTo prepare for glazing, the foot ring is waxed. This helps keep glaze from sticking to the foot. Because the silica in glaze is melted to a molten glass state during the glaze fire, no part of the pot that touches the kiln shelf can have glaze on it. If it does it will be permanently welded to the shelf after the firing. I use orange colored wax so that I can see where I have painted it. |
 |
Glaze & Load Glaze FireI dip the pots in a bucket of glaze to evenly coat them. The glaze is a suspension of powdered materials in water. Because the bisqued pots are porous, they absorb the water from the glaze. A delicate, powdery coating is left on the pots. I sponge off the feet to make sure there is no glaze on that surface, and load the pots in the kiln. The pots cannot touch each other during glaze firing. The powdered glazes often look nothing like the glassy finishes they produce after firing. |
 |
Glaze FireThe kiln reaches temperatures over 2200F during glaze firing. This causes the powdered glaze to transform into a strong, glassy coating. Inside, the clay vitrifies to a state where it will no longer absorb water. The glaze firing lasts about 10 hours for cone 6, and sometimes I do a controlled cool down by applying heat for an extra 4 hours. Then I must wait 10 - 12 hours to open the kiln. It is very exciting to open the kiln and see the transformed pots glistening inside! |
 |
Finished PotFinally, the pot is complete. This process may take weeks from start to finish. And the pot shrinks about 10 - 12% from the wet state to the final glazed state. This bowl is ready to serve food or decorate a table. |


Copyright © 2005 Evolution Stoneware Pottery, LLC. All Rights Reserved.